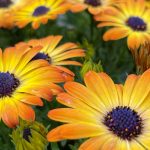
Clematis are called the “Queen of all Vines” for good reason. Their show stopping flowers are the glory of a sunny perennial garden. However, as we’ve discussed in previous blogs, Clematis can be tricky to grow in Alberta. As a follow up to my blog called Where and How to Plant a Clematis please place the link here In this blog, I’ll share about how to care for Clematis and how to prune Clematis.
Once a Clematis is placed safely in the ground in its habitat of sunshine for its head and shade for its feet, the task becomes caring for it throughout the summer season.
How to Care for Clematis
Clematis have 5 simple needs.
1. Clematis need a sunny place to grow.
Clematis is a sun lover, requiring a minimum 6 hours to grow well. It will grow well in more than that, and enjoys a break from the sun in the later afternoon – it likes a break from the heat and a little less intense sun at that time of day helps with flower fade on the older blossoms.
Be on the watch for things that will block sunlight. Houses and garages next door, house eves, trees, fences, pillars, and posts can all block sunlight.
2. Clematis like to have cool feet.
Clematis like to grow in a spot that keeps their feet cool. As a matter of fact, once the soil temperature reaches 25 C (77 F), the roots will stop growing. How do you accomplish that when they like to have their heads and stems sunny? You will have to create some shade. How to create shade for the base of a Clematis:
- Mulch – a 3″ (7 cm) layer of ground up leaves and bark are a good way to keep the base of a Clematis shady. Keep a ring of about 6″ (15 cm) bare around the stem. It’s important to keep the mulch away from the plant stem so it doesn’t get wet and infected.
- Avoid large rocks or rock mulches – they warm up with the sun and will end up making the roots hotter instead of cooler.
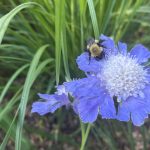
- Shrub – a low growing shrub like a Spirea will keep that
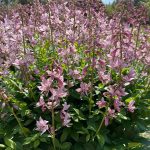
- Perennial – robust perennials like Perennial Salvia or fall blooming Sedums will provide adequate shade for the base of a Clematis vine.
3. Clematis like to grow in moist but not wet soil.
Clematis require a rich soil base that holds moisture but drains well. Soggy, wet soil means guaranteed death of a Clematis because its roots will rot. Always check Clematis before watering. When the soil feels dry at 4″ (10 cm) deep in the soil, give it a good drink of water. Watch your Clematis well during dry spells and water deeply.
4. Clematis need something to climb on.
Being a vine, some Clematis can grow up to 20′ (6 m) long. Clematis have long stems to their leaves. These are called pedioles. They climb support structures by wrapping their little pedioles like arms around structures as they climb. Because the pedioles are 4-6″ (10-15 cm) long, you need to watch that what you put in place is narrow enough for them to grasp onto. Fences with wide boards and house siding, smooth or rough, will not work for Clematis.
Supports with narrow braces look like:
- Trellises
- Obelisks
- Arbors
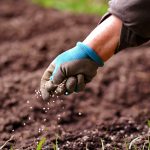
5. Clematis need to be fertilized regularly.
Fertilize Clematis regularly from June – August because they are actively growing. This is a little different from other perennials because most perennials don’t need much fertilizer. Fertilize with an evenly balanced fertilizer like 20-20-20, or something with a little more Phosphorus for blooming, like 15-30-15 every 3 weeks. Follow package directions carefully.
How to Prune Clematis
Why Prune Clematis
A Pruned clematis is a healthy clematis. Trimming Clematis back controls the growth pattern and improves overall Clematis performance by:
- Improving air circulation throughout the vine
- Providing better light exposure all over the plant
- Stimulates fresh growth
- Boost flowering
Pruning Clematis Step by Step
Trimming Clematis is quite simple. All you need is a few simple tools and you will be on your way!
The tools you will need to trim a Clematis include:
- Hand Clippers — freshly washed in warm, soapy water to prevent the transmission of bacteria or any other damaging soil borne infection.
- Hook & Loop Tape or other gentle tie for attaching Clematis to the support.
Trimming a Clematis
- Determine where the Clematis needs to be trimmed. Some guidelines recommend trimming Clematis to 12″ (30 cm) above the ground, while other Clematis types have different requirements. Once you know where you need to trim, get your clippers out.
- Trim the Clematis stem by stem so you cut it back in the right place.
- Cut the Clematis just above the leaf nodes as seen in the photo. Leaf nodes are the spot on the stem where the leaves come out of the stem. Clematis have two leaves that come out of the stem opposite one another.
- Go up about 2 cm (.75″) and clip it.
- Once you have trimmed stem to stem, collect all the stems and leaves and remove them from where the Clematis is growing. Keeping the area clean from decomposing Clematis material is a good idea so that no disease is passed onto the growing Clematis.
- Wash your clippers well so they are clean and ready for their next task.
When to Prune Clematis
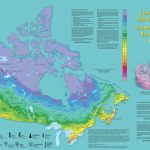
Clematis are broken up into 3 different pruning classes. The label included with each Clematis should indicate which class they are.
The pruning groups are called A,B, & C – or 1,2, & 3. Group A would be the same as Group 1, Group B the same as Group 2, and Group C the same as Group 3.
Let’s look at each Clematis Pruning Group individually:
When to Prune Clematis Pruning Group A/1
This group of Clematis blooms on old wood from last year’s growth. Typically this group is from horticultural growing zone 6 & 7, so we won’t see these in the Edmonton area.
Prune this group back in spring or summer after they have budded, cut back the old, dead wood from the vines
When to Prune Clematis Pruning Group B/2
Clematis Group B is a large flowering type that is usually horticultural Zone 4 rated Clematis. Most Clematis that grow in Canada are in this group. This set is a heavy bloomer in the spring and then it continues to bloom all through the summer, but not as profusely as it did in the spring.
Clematis group B is divided into two subgroups: B1 & B2.
- Clematis Group B1: Initially flowers on older stems in spring and reblooms on new growth in the late summer.
- Clematis Group B2: The blossoms occur on older stems and new growth simultaneously.
For pruning both subgroups, you have 2 options:
- Lightly prune a few stems in the spring to encourage strong buds & to promote branching & blossoms on new growth while letting other old stems grow to produce the spring bloom
- OR, you could prune the entire plant back every two years and just miss the spring flush
When to Prune Clematis Group C/3
Clematis Group C is a later bloomer and only flowers on new growth. Once they get going, they will bloom from July until frost in the autumn. This group comprises Clematis that are usually horticultural Zones 5 and 6.
Prune back this group hard in early spring. Count up four leaf nodes from the ground (this will probably come to 30 cm or 12″ from the soil line. This trim will encourage branching, thicker growth, and more flowering.
To Sum up the Care & Pruning of Clematis
Clematis is a unique class of flowers all on its own. The first key to growing Clematis successfully is the correct placement in the garden. After that, they have five basic needs. Being planted too shallowly, poor drainage, and wet feet are the things that weigh heavily on a Clematis’ life.
The fact that there are three different pruning groups can make Clematis confusing. Most Clematis in our Alberta climate will be in pruning group 2, so that simplifies things for us.
Once Clematis are up and established, they usually stick around for a long time.
If you would like to discuss more about Clematis or any other aspect of gardening, feel free to message me and I will get back to you.
© Sharon Wallish Murphy, Gardening with Sharon